Updated for BabyView AI 2.0 — November 2025
This guide explains everything you need to know about accessing, generating, managing, and troubleshooting BabyView AI images.
BabyView AI is available within the Bomee admin portal: admin.bomee.io
For more information on this feature and to get it enabled under your account please email us at us_help@humanscape.io.
Overview
- Purpose: BabyView AI helps studios offer a unique, modern experience by turning standard ultrasound images into realistic AI-generated visuals.
- Where to Access: Available in the Admin Portal — admin.bomee.io
- Activation: If you don’t see BabyView AI in your account, please contact us at us_help@humanscape.io
- App Version Requirement (for Customers):Users must be on Bomee App v2.63.1 or higher to view their AI images.
Note: All new users who installed the app after May 2025 already have the required version or higher, so no additional action is needed.
Accessing BabyView AI (for Studios)
- BabyView AI is available exclusively through the Bomee Admin Portal:
https://admin.bomee.io
The admin portal is web-based only and does not operate on mobile devices or mobile browsers.
- For optimal performance and full feature access, we recommend using the Google Chrome browser on a desktop or laptop computer. Other browsers (e.g., Safari, Edge, Firefox) may experience compatibility or display issues.
How to Generate a BabyView AI Image
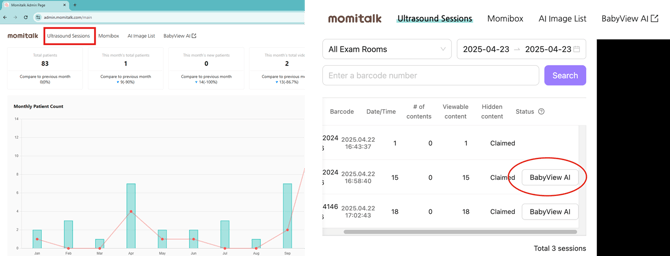
[Step 1] Open the Session
- Go to admin.bomee.io → [Ultrasound Sessions]
- Search by barcode or date.
- Click BabyView AI next to the desired session.
(Button only appears if there is at least one captured image.)
IMPORTANT: For best results, we recommend performing BabyView AI for pregnancies at 20 weeks or later. If the ultrasound image does not clearly show the baby’s face, generation may fail with a message indicating that “the face cannot be seen clearly.”
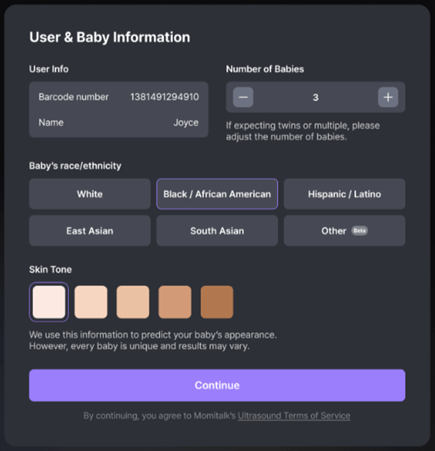
[Step 2] Choose Baby Count & Race/Ethnicity
- Number of Babies
- Default is 1, adjustable up to 5 for twins or multiples.
Note: If you selected more than one photo for twins or multiples, a separate charge will apply for each photo within the same session.
- Race / Ethnicity
- Select the baby’s race or ethnicity to help generate more natural and realistic facial features.
- The AI engine uses this information solely to enhance the visual accuracy of the generated image.
- New: 5-Level Skin Tone Settings (BabyView AI 2.0)
- BabyView AI 2.0 introduces a five-level skin tone adjustment feature, allowing you to fine-tune the visual tone of the generated baby image.
- This setting helps better match each family’s background while maintaining realistic newborn characteristics.
- Click "Continue"
Note:
- The AI has been updated to reflect the biological reality that newborns typically have lighter or more neutral skin tones due to lower melanin development at birth.
- The generated skin tone may not perfectly match the baby’s actual appearance.
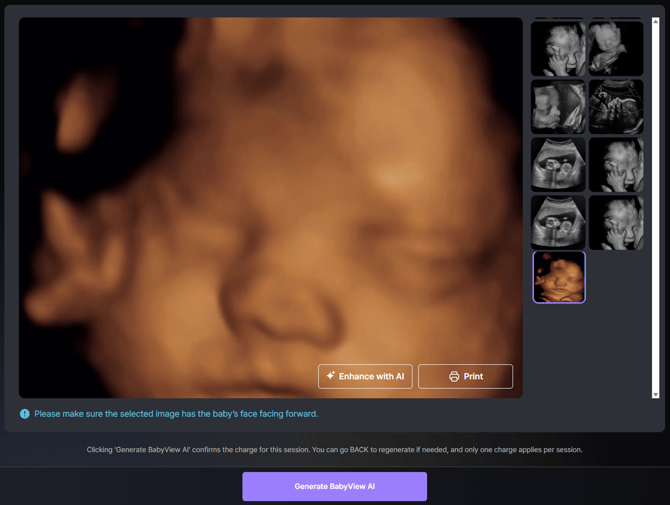
[Step 3] Choose the Image
- Select the ultrasound image you’d like to use.
- Optional: Click Enhance only if the image is extremely blurry or dark.
(This pre-enhances the input image before AI generation.)
Note: For best results, use a front-facing image of the baby’s face.
- Once ready, click “Generate BabyView AI” below.
- Processing Time: Image generation typically takes 1 to 3 minutes, depending on network speed and server load. You can stay on the page during processing — the final result will appear automatically once complete.
IMPORTANT - MUST READ: Charging Policy
Clicking “Generate BabyView AI” confirms the charge for this session.
After this step:
-
You can go back and regenerate using a different image if needed.
-
Only one charge applies per session, regardless of how many times you regenerate within that same session.
-
If multiple babies are selected (e.g., twins or multiples), a separate charge applies per baby.
Note:
Again, the charge is confirmed as soon as you click “Generate BabyView AI.”
Re-generations within the same session will replace the previous AI image without additional cost.
Reviewing and Finalizing Your BabyView AI Result
Once the AI image is generated, you’ll see the result screen as shown below:
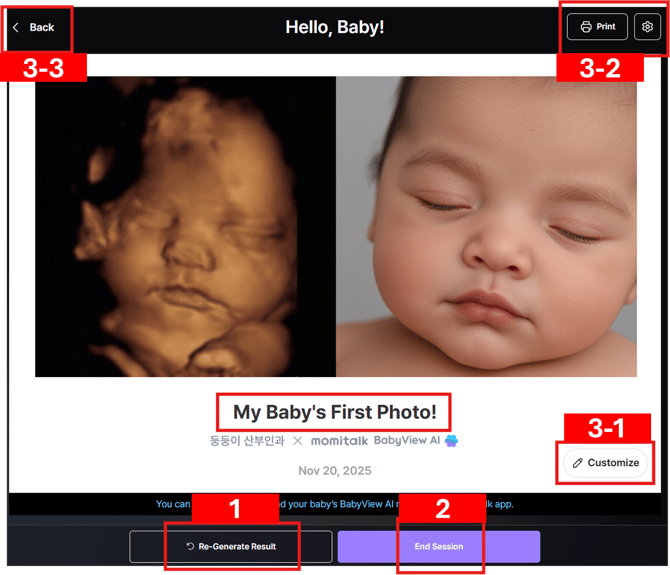
From here, you can review, re-generate, or finalize your result before completing the session.
1. End Session
- Click “End Session” if you’re satisfied with the result.
- Once the session is ended:
- The BabyView AI image is finalized and automatically uploaded to the Bomee app for the customer to view.
- The session is considered complete and no further changes can be made.
2. Re-Generate Result
- Click “Re-Generate Result” if you’d like to create a new version of the image.
- You can re-generate multiple times within the same session at no additional cost.
- When you re-generate:
- The previous AI image will be replaced by the newly generated one.
- The process will run again (takes another 1–3 minutes).
- You’ll be shown two versions side-by-side for comparison and can select your preferred one.
- When you click “Re-Generate Result,” a short feedback window will appear asking why you want to re-generate.
→ Please answer carefully — this feedback helps us continuously improve BabyView AI’s accuracy and quality.
Note: Re-generation is available only before you end the session. Once End Session is clicked, the current image is locked, and any further generation after "ended session" will be considered a new, billable session.
3. Additional Options
3-1. "Customize" Message
- Click “Customize” to change the text caption below the photo.
- The default caption is “My Baby’s First Photo!”
- You can freely edit it (e.g., “Welcome Baby Emma!”).
3-2. Print
- Click “Print” to print the image directly from your connected printer.
- By default, both the ultrasound photo and the BabyView AI image will print side-by-side.
- To print only the BabyView AI image, click the gear (⚙️) icon next to the Print button and select your preference.
3-3. "Back" to change original ultrasound image
- Click “Back” to return to the image selection screen if you want to use a different ultrasound image.
- Note that going back will delete the previously generated AI image for this session.
Managing Generated Images (AI Image List)
Once you have completed or ended sessions, you can view and manage all generated AI images in one place.- Go to admin.bomee.io → AI Image List
- Use the search bar to find specific results by barcode or date
- Click the eye (👁) icon under Manage to toggle visibility:
- Public → Visible to customers in the Bomee app
- Private → Hidden from customer view
- Use this view to confirm whether the image was uploaded properly or to control which results are visible to customers.
Tip: If a mom reports not seeing her AI photo, first check the AI Image List to ensure visibility is set to Public and the barcode is correctly linked to their Bomee account.

Twins/Multiples
- In the ‘Baby Count & Race/Ethnicity Selection’ page, the user can select 1-5 babies
- For multiples, on the final page, the button at the bottom says End Session or Next Baby. If the user clicks next baby, the user will be re-directed to the capture list with all of the previously captured images remaining, and can select another image to generate a BabyView AI image
- For multiples, images for each of the babies will all be shown in the ap
For further assistance or clarification, please email our support team at us_help@humanscape.io.